I’ve made a lot of cookies over the years, and these Fudgy Chocolate Peppermint Thumbprint Cookies have become a holiday favorite! They’re soft, fudgy, and filled with creamy white chocolate that sets just right. Simple to make and full of festive flavor, these thumbprints always disappear fast on cookie trays.

A Quick Look At The Recipe
Recipe: Peppermint Thumbprint Cookies
Ready In: 1 hour 30 minutes (mostly chill time!)
Serves: 26 cookies
Staple Ingredients: cocoa powder, eggs, butter, peppermint extract, white chocolate, coconut oil, peppermint candy
What Makes It Special: this cookie combines the flavor of classic peppermint bark with the fudgy texture or brownie cookies. I love the white chocolate center, it adds the richness and texture this cookie needs! Adding peppermint extract into the dough and filling gives these the minty flavor you crave.
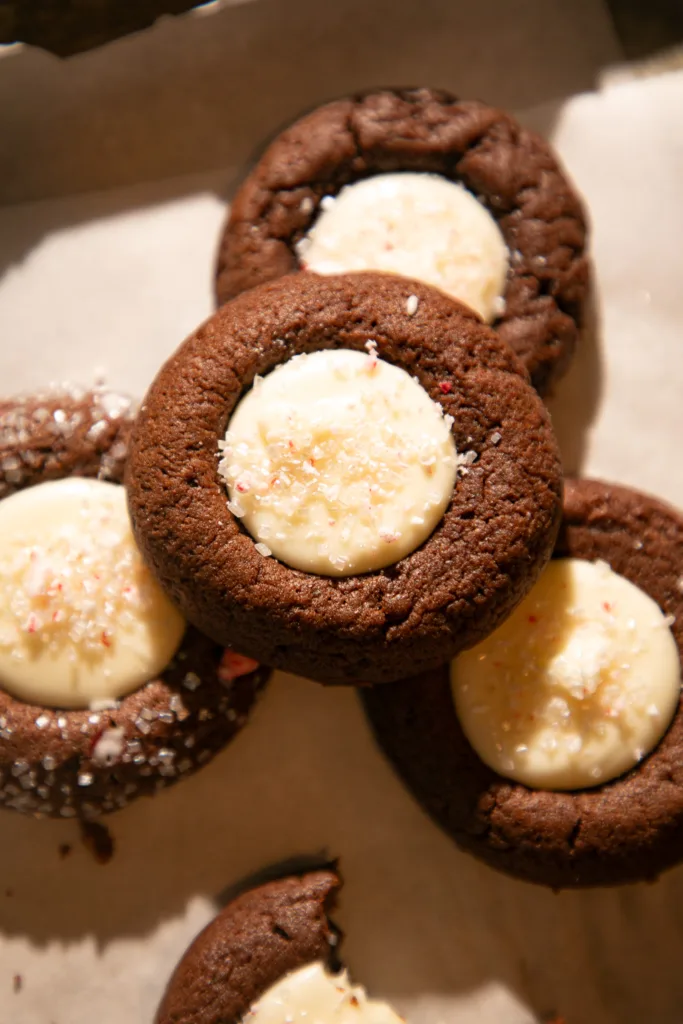
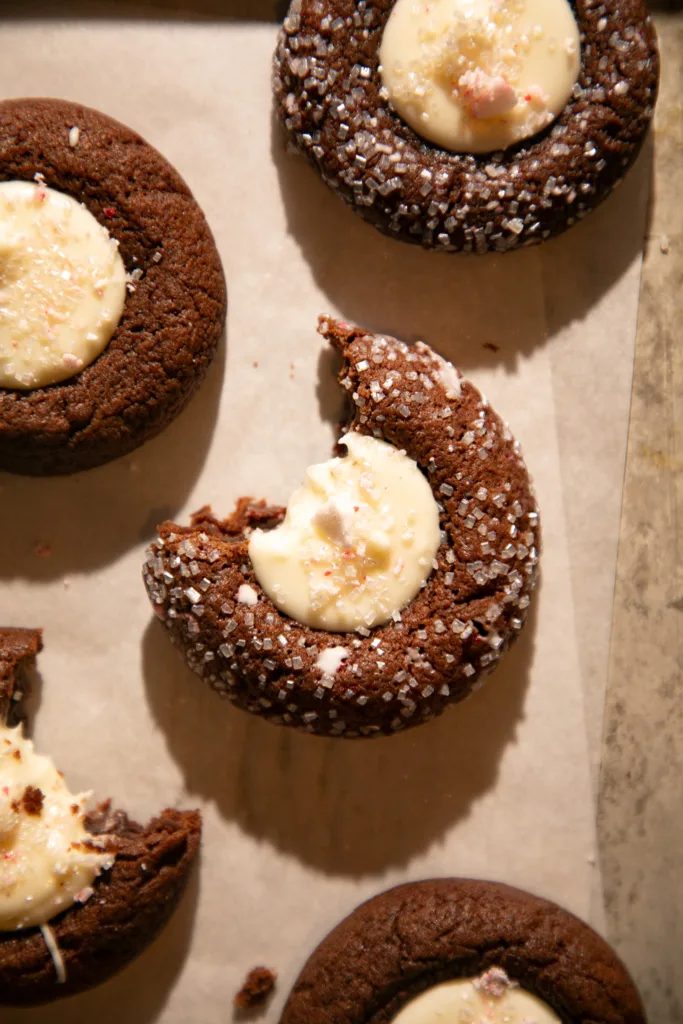
These chocolate peppermint thumbprint cookies are the kind of treat that disappear fast on any cookie tray or treat box! They’re soft, fudgy, and filled with rich white chocolate. The contrast between the chocolate cookie and the white chocolate filling makes these pop, roll in crushed peppermint candies or top with peppermints to add some color.
I’m all about simple techniques that make home baking feel a little more special. Melting the white chocolate with a touch of coconut oil helps it stay silky smooth, and pressing the centers while the cookies are still warm gives you that perfect thumbprint shape every time. A roll in coarse sanding sugar gives the cookies some texture and a fun finish!
If you’re in the holiday baking mood, you might also love my Egg Nog Oatmeal Cream Pies or these Soft Cut Out Sugar Cookies! Find all of my Christmas recipes and dessert recipes here for more baking inspiration!
More Peppermint Treats!


Key Cookie Ingredients
These cookies are made with simple pantry ingredients, many you probably have on hand. Make sure you grab some peppermint extract and peppermint candies.
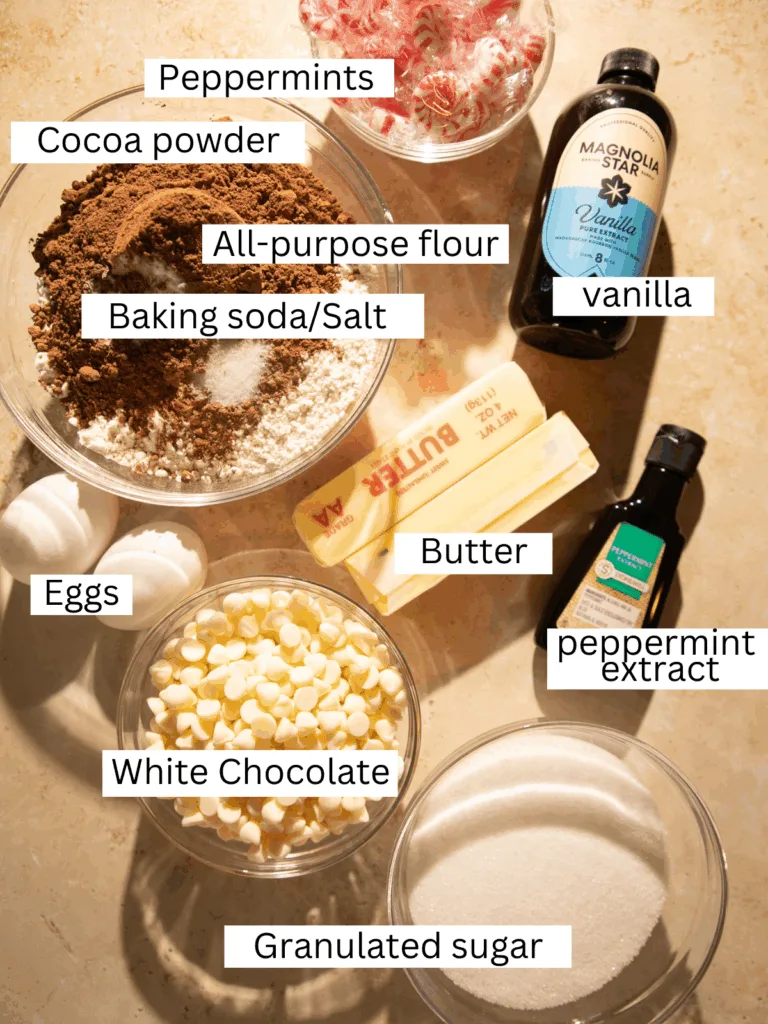
- Unsalted Butter: Melted for a fudgy, brownie-like texture. Let it cool slightly before mixing so it doesn’t cook the eggs.
- Granulated Sugar: Adds sweetness and helps the cookies spread slightly.
- Eggs: Room temperature eggs blend smoothly into the melted butter for a soft, even dough.
- Vanilla Extract: Adds warmth and balances the peppermint flavor.
- Peppermint Extract: Strong and refreshing. Start with 2 teaspoons or use a little less if you prefer a lighter mint flavor.
- All-Purpose Flour: Provides structure and keeps the cookies soft and chewy.
- Unsweetened Cocoa Powder: Use a good-quality cocoa for rich, deep chocolate flavor. Dutch-process will give a darker color.
- White Chocolate Chips: Melted to create a smooth, creamy filling. Real white chocolate gives the best flavor.
- Peppermint Extract (for filling): Gives the white chocolate center a cool, minty flavor.
- Coconut Oil: Helps the white chocolate melt evenly and set with a glossy finish.
- Crushed Peppermint Candy or Sanding Sugar (optional): Adds sparkle, crunch, and a festive touch.
How to Make the Thumbprint Cookies
Let’s talk a little about how to make the peppermint cookies (The printable instructions are in the recipe card below.)
Quick overview:
- Combine wet ingredients, fold in dry ingredients.
- Chill, scoop, indent, and bake cookies. Melt chocolate.
- Fill baked cookies, let set, and enjoy.
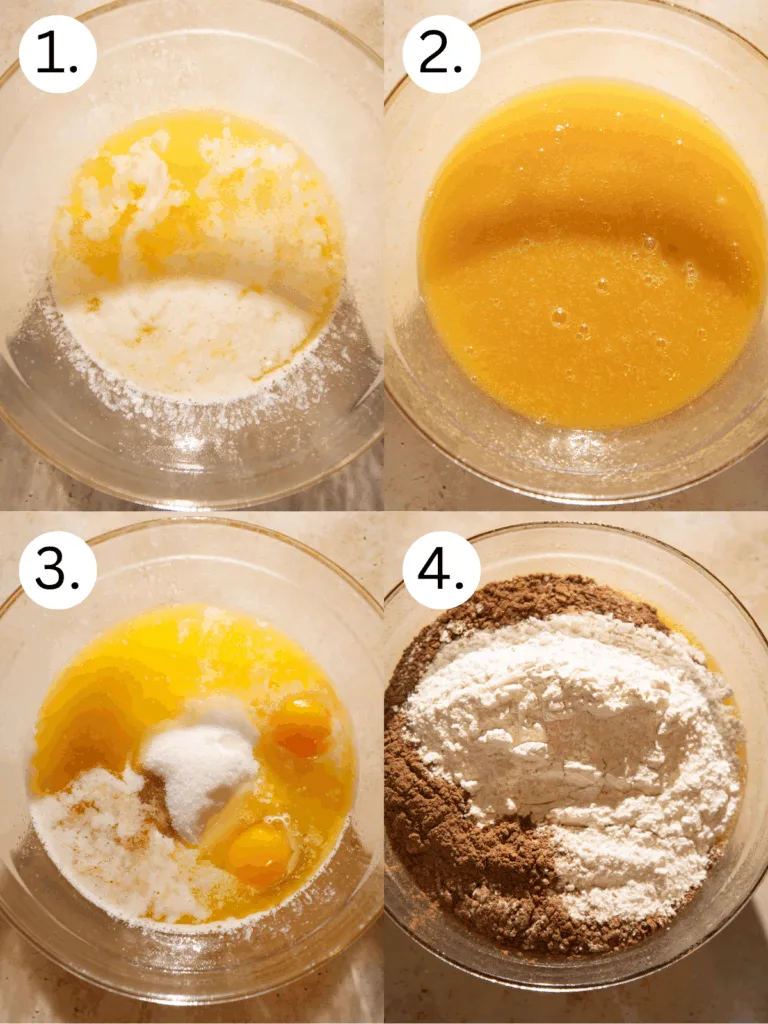
- In a large mixing bowl combine the melted butter, sugar, eggs, vanilla, and peppermint extract. Mix to combine.
- To the wet ingredients add in the flour, baking soda, cocoa, and salt. Mix until evenly combined. Cover and chill dough for 45-60 minutes.
- Preheat oven to 350 degrees F and line baking sheets with parchment paper, set aside.
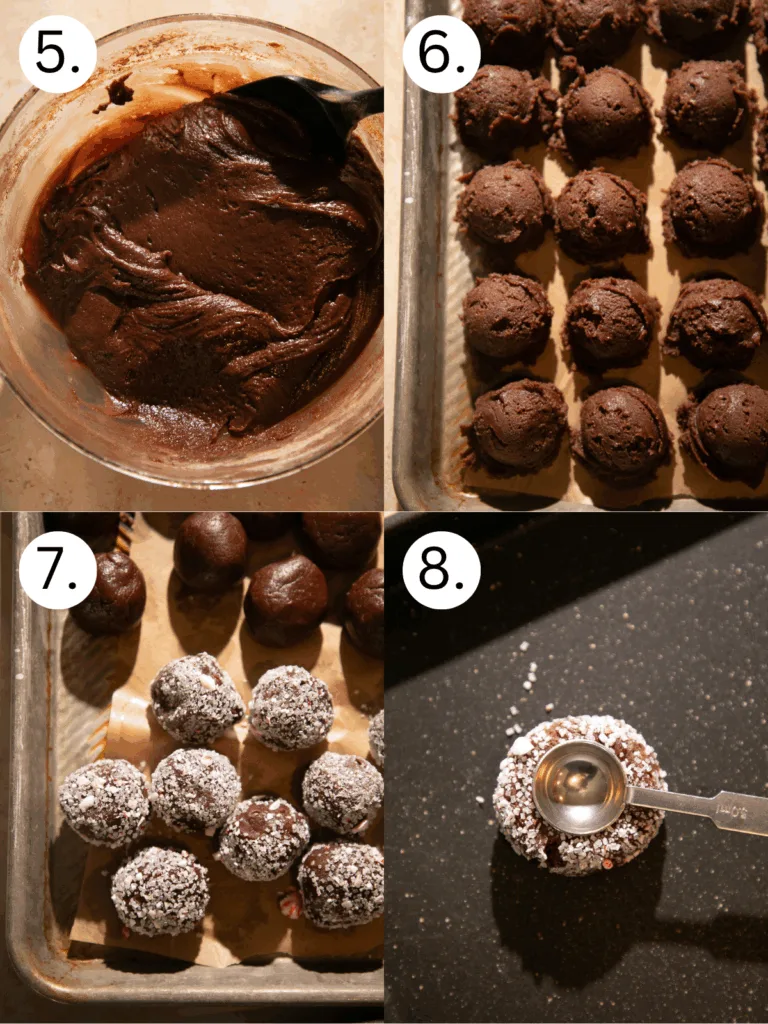
- Use a portion scoop or cookie scoop to scoop 1 oz. scoops of cookie dough, roll into a ball and place 2-3″ apart on the prepared baking sheet. Use the back of a measuring spoon or your finger to create an indent in the center of each cookie. Repeat with all the dough. If desired, roll your cookie dough ball in crushed peppermint candies or sanding sugar before pressing and baking.
- Bake for 7-9 minutes or until set. Cookies will still be a bit soft but will set up as they cool. Allow cool slightly on the baking sheet before transferring to a wire rack to cool completely. Repeat with remaining cookies. If needed, use the measuring spoon to indent the cookies again while still warm.
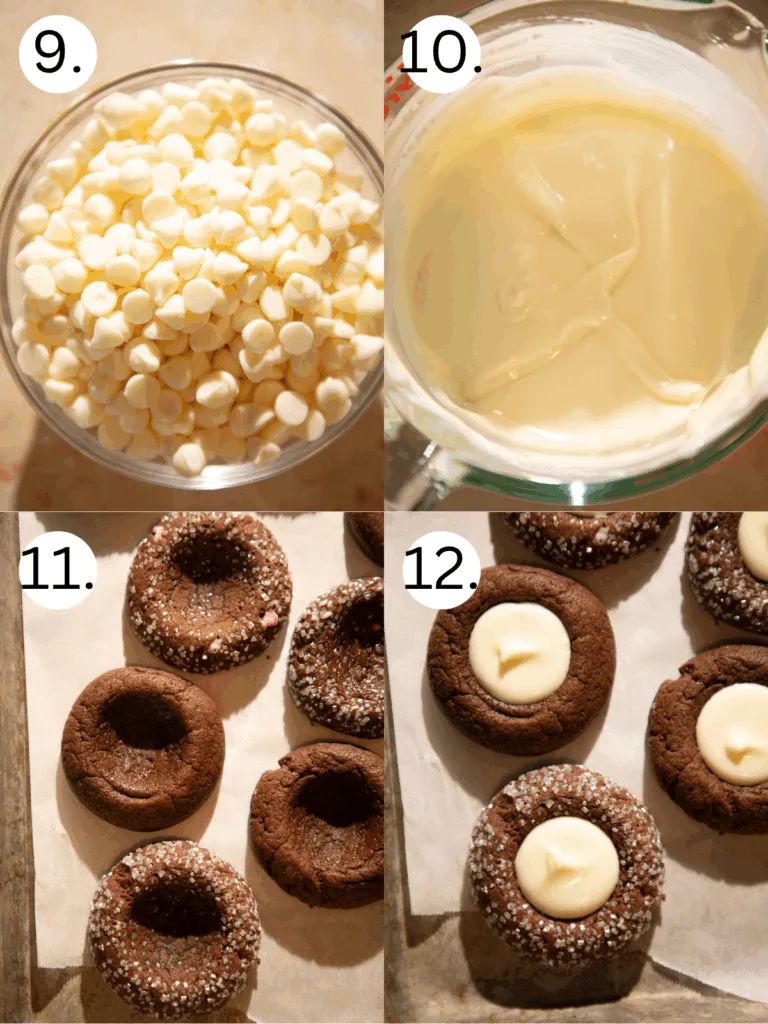
- In a microwave safe bowl combine white chocolate and coconut oil, microwave in 30-45 second intervals, stirring each time, until the chocolate is smooth. Mix in peppermint extract.
- Fill each cookie with a dollop of the melted white chocolate and if desired, top with a sprinkle of the crushed peppermint candies. Let set and enjoy!

White Chocolate Peppermint Thumbprint Cookies
Equipment
Ingredients
- 1 cup Unsalted butter, melted
- 1 cup Granulated sugar
- 2 whole Eggs, room temperature
- 1 tbsp Vanilla extract
- 2 tsp Peppermint extract
- 2 1/4 cups All-purpose flour
- 1/2 tsp Baking soda
- 1/2 cup Unsweetened cocoa powder
- 1 tsp Kosher salt
- 10 oz. White chocolate chips
- 2 tsp Peppermint extract
- 1 tsp Coconut oil
- Crushed peppermint candy or sanding sugar, for rolling, optional
Instructions
- In a large mixing bowl combine the melted butter, sugar, eggs, vanilla, and peppermint extract. Mix to combine.1 cup Unsalted butter, 1 cup Granulated sugar, 2 whole Eggs, 1 tbsp Vanilla extract, 2 tsp Peppermint extract
- To the wet ingredients add in the flour, baking soda, cocoa, and salt. Mix until evenly combined. Cover and chill dough for 45-60 minutes.2 1/4 cups All-purpose flour, 1/2 tsp Baking soda , 1/2 cup Unsweetened cocoa powder, 1 tsp Kosher salt
- Preheat oven to 350 degrees F and line baking sheets with parchment paper, set aside.
- Use a portion scoop or cookie scoop to scoop 1 oz. scoops of cookie dough, roll into a ball and place 2-3" apart on the prepared baking sheet. Use the back of a measuring spoon or your finger to create an indent in the center of each cookie. Repeat with all the dough. If desired, roll your cookie dough ball in crushed peppermint candies or sanding sugar before pressing and baking.Crushed peppermint candy or sanding sugar
- Bake for 7-9 minutes or until set. Cookies will still be a bit soft but will set up as they cool. Allow cool slightly on the baking sheet before transferring to a wire rack to cool completely. Repeat with remaining cookies. If needed, use the measuring spoon to indent the cookies again while still warm.
- In a microwave safe bowl combine white chocolate and coconut oil, microwave in 30-45 second intervals, stirring each time, until the chocolate is smooth. Mix in peppermint extract.10 oz. White chocolate chips, 2 tsp Peppermint extract , 1 tsp Coconut oil
- Fill each cookie with a dollop of the melted white chocolate and if desired, top with a sprinkle of the crushed peppermint candies. Let set and enjoy!
Notes
- Peppermint extract: don’t skip this, it adds the perfect minty flavor!
- Rolling sugar: Coarse sugar gives the cookies sparkle and a light crunch, while fine sugar makes a smoother surface, both work or roll in peppermint candies!
- Perfect indent: Press gently with a teaspoon before baking and while the cookies are still warm to create the perfect indent for the chocolate.
- White chocolate: Stir in a small amount of coconut oil or shortening while melting for a smooth chocolate. If your chocolate hardens up, still in a bit more coconut oil or butter to help thin it back out.
- Make ahead: Bake the cookies a day in advance, then fill them once cooled. Cookies can also be stored in the freezer for several months.
Nutrition
If you enjoyed this recipe, I would appreciate if you left a star rating on the recipe card above or a comment below sharing your experience! I value your feedback, it would also mean a lot if you could share this recipe or my website with friends or loved ones. Cheers!
Storage, Freezing & Serving
Store cooled cookies in an airtight container at room temperature for up to 5 days. If stacking, place a piece of parchment between layers to keep the white chocolate centers neat. While chocolate center is still melted, place in the fridge to help set up before storing.
To freeze, place unfilled or filled cookies in a single layer on a baking sheet until firm, then transfer to a freezer-safe container or bag. They’ll keep well for up to 2 months. Thaw at room temperature before serving or warm for a few seconds in the microwave if you want a quick sweet treat!
For serving, I like to warm them just slightly so the centers soften again, 5 to 10 seconds in the microwave does the trick.
Frequently Asked Questions
Yes! Crushed candy canes work perfectly. Blitz them in a food processor or by hand.
They’ll firm up at room temperature in about 30 minutes or faster if you pop the tray in the fridge for 10–15 minutes.
You can! Chill the dough for up to 24 hours before baking. If its too firm to scoop, let it rest at room temperature for 10–15 minutes.
Use real white chocolate chips or chopped baking bars. Candy melts can work, but real chocolate gives the best flavor and texture.
Yes. Once cooled, freeze them in a single layer until solid, then store in a sealed container or bag for up to 2 months.
Tools I Recommend
- Portion Scoops – my go to for getting even sized cookies that bake perfectly each time!
- USA Pan Half Sheet Pan – my go-to sheet pans, these are truly non-stick and clean up nicely.
- Rubber Spatula – a must have! I like these because they don’t come apart so I don’t have to worry about water getting inside the spatula and causing mold.
- Pyrex Mixing Bowl Set – I love this set of nesting bowls. I use them for everything, Pyrex glass does not break easily so you can trust on these bowls for years, plus they come in 3 useful sizes and can be stacked!

Did you try this recipe?
Let me know what you thought by leaving a comment below and sharing your final dish on Instagram, Facebook, & Pinterest!
Cheers!
-Rachel